Learning Outcomes
- Use animations in PowerPoint
In a previous module you learned about transitions in PowerPoint, in other words, how a slide enters or exits the presentation stage. PowerPoint also uses a tool to include animations on objects within slides. Take for an example, a slide with list in it where you would like each of the bullet points to appear one at a time and in a different way. How do you make this happen? Animation.
PowerPoint Animation
In PowerPoint stock animations can be used or modified to fit a custom timeframe or pathway. For the most part, stock animations are used in presentations, but if you have time and inclination you can create your own custom animations.
Returning to the Q3 Sales Campaign presentation, it contains a list slide that could benefit from animation. Here are some of the ways to add animation into a presentation.
Adding Animations
- Open a PowerPoint presentation and select the slide where the animation will be added.
- Highlight the first section you wish to animate. In this case the first point in the list.

- Select the Animation tab and options in the ribbon appear.
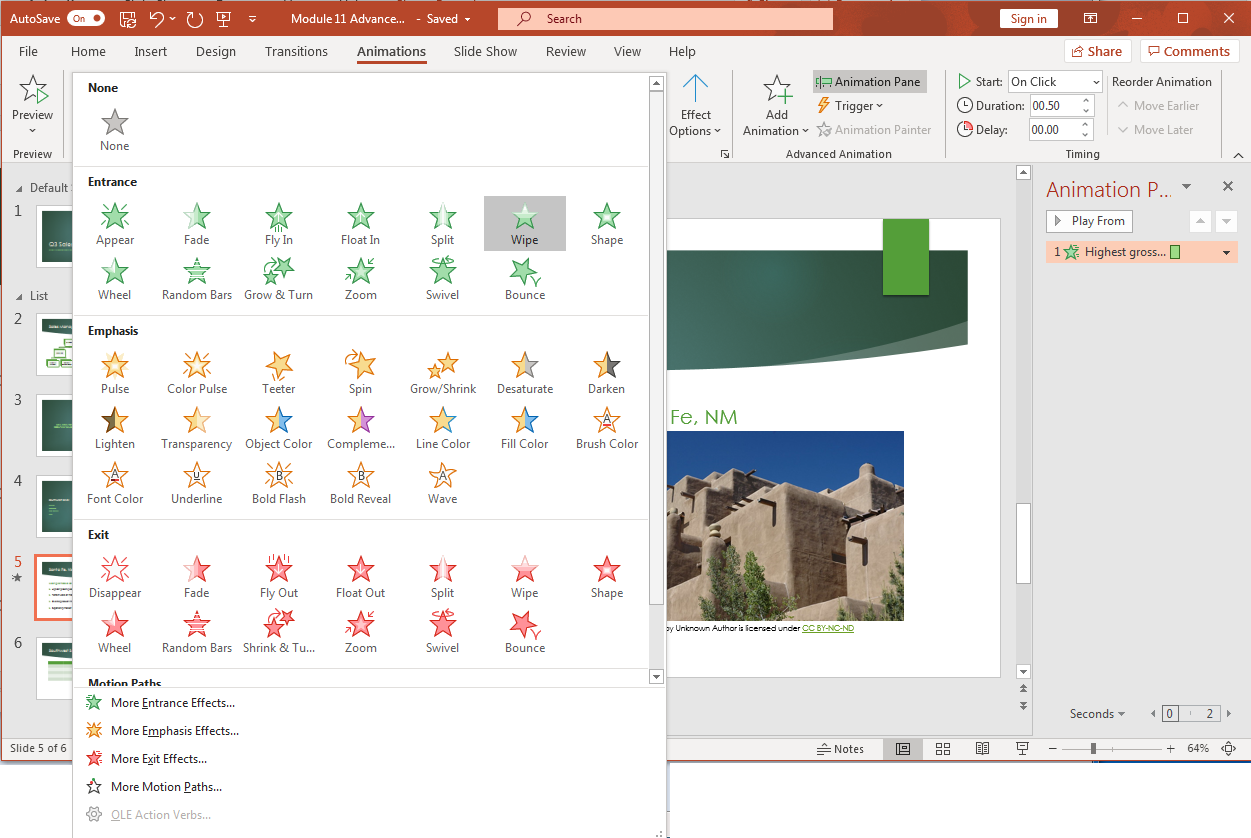
- Scroll through and choose one of the animation stars, in this case the ‘rise up’ star is selected.

- An alternative way to add an animation is to click the down arrow in the Animation area and a drop-down menu displaying all the options appears. (Select the Animation Pane button to open the animation menu on the right side for easier navigation for the selected effects.)

- Once a few of the effects have been added to a slide, click the Preview button to watch the speed and effects on the slide. Notice that the speed of the animations runs quick. You might need more time between effects to speak in your presentation.
- To change the speed and duration, select a section, and navigate to the Timing group in the ribbon. Adjust the start time, duration and delay time for each effect.

- Notice that each of the text lines that are animated have numbers to the left of them. This is a visual way for you to easily recognize what has animation already attached to it. Be sure to run the Preview again to test out your new timing and adjust where needed.
- If you find that the sequence needs adjustment, drag and drop the effects in the Animation Pane until the order matches what you want or use the Reorder Animation buttons to move an effect to earlier or later in the slide.

- Another option is to select how each of the animations will be triggered and started. Select the Trigger button, and choose how each animation is begun, for example, when you click on the title of the slide.

- Now you have animated a slide. Be sure to run through the Preview as many times as necessary to get the animations and timing correct for that slide before moving to the next slide. Continue to choose from animations for entrances, emphasis, exits and motion paths as various animations are added to slides.
- If you decide later to get rid of the animations, return to the Animation tab, and select the None option. This will remove the previously added animation for that selected element.

Practice Questions
Watch this video to get another example of how a PowerPoint can use animation to benefit a presentation.
As with most things in PowerPoint, a little will go along way with animation. Be aware of the number of animations used in a presentation. Think from the audience’s perspective when adding animations. Ask yourself if it is a benefit or a distraction in a slide before settling on an animation. You want the effect to enhance your presentation, not pull attention away from what the presentation is aiming at communicating.
Candela Citations
- Animations in PowerPoint. Authored by: Sherri Pendleton. Provided by: Lumen Learning. License: CC BY: Attribution
- PowerPoint: Animating Text and Objects. Authored by: GCFLearnFree.org. Located at: https://youtu.be/kw_udjD2xwo. License: All Rights Reserved. License Terms: Standard YouTube License
