Learning Outcomes
- Send and receive email messages
- Send and receive attachments
Email Client
Free web-based email using a webmail interface is available to anyone. There is no software needed to download or install on your computer. To create a new email account, you can use your internet browser and choose from web-based email providers such as Microsoft’s outlook.com, Google’s gmail.com, and Yahoo!’s mail.yahoo.com. Each of those sites will guide you through the steps needed to create an account. Free email accounts are often linked to other services such as instant messaging and cloud storage. Those services will be covered later in this module.
In addition to web-based email, Microsoft Outlook can also be downloaded as a desktop application on your computer, also known as an email client. It still sends and receives emails using the internet, but allows you to open your email using the Microsoft Outlook application instead of using an internet browser. If you use the desktop email client, the email server sends you a copy of the message and stores it locally. Then when you are offline, you can still open and see recent emails that have been stored locally, as well as draft emails that will be sent later when you are online.
In this module, we will focus on using email in the Microsoft Outlook email client because it is a common application used by businesses, but similar capabilities are available in other email applications and in the web-based Outlook email.
OUTLOOK on a Mac
Microsoft Outlook is available for download on a Mac and should have the same functionality and look very similar to the screenshots provided in this module.
PRACTICE QUESTION
Inbox
When you first open Microsoft Outlook, you will be in your Inbox.

- Folder pane. The folder pane shows all your folders. The bold numbers indicate the number of unread messages in that folder.
- Message list. This lists your messages in chronological order.
- Reading pane. The reading pane displays the currently selected email (the one with the light blue background on the message list).
- Ribbon. Outlook has a ribbon similar to other Microsoft applications such as Word and Excel. The screenshot above shows the Home tab of the ribbon. You can click on each tab and navigate the ribbon to find various actions and settings.
- Search box. The search box allows you to search for an email by keyword, sender, recipient, etc.
Composing a New Email
To send an email, select New Email. This will open a new window where you can compose your email.
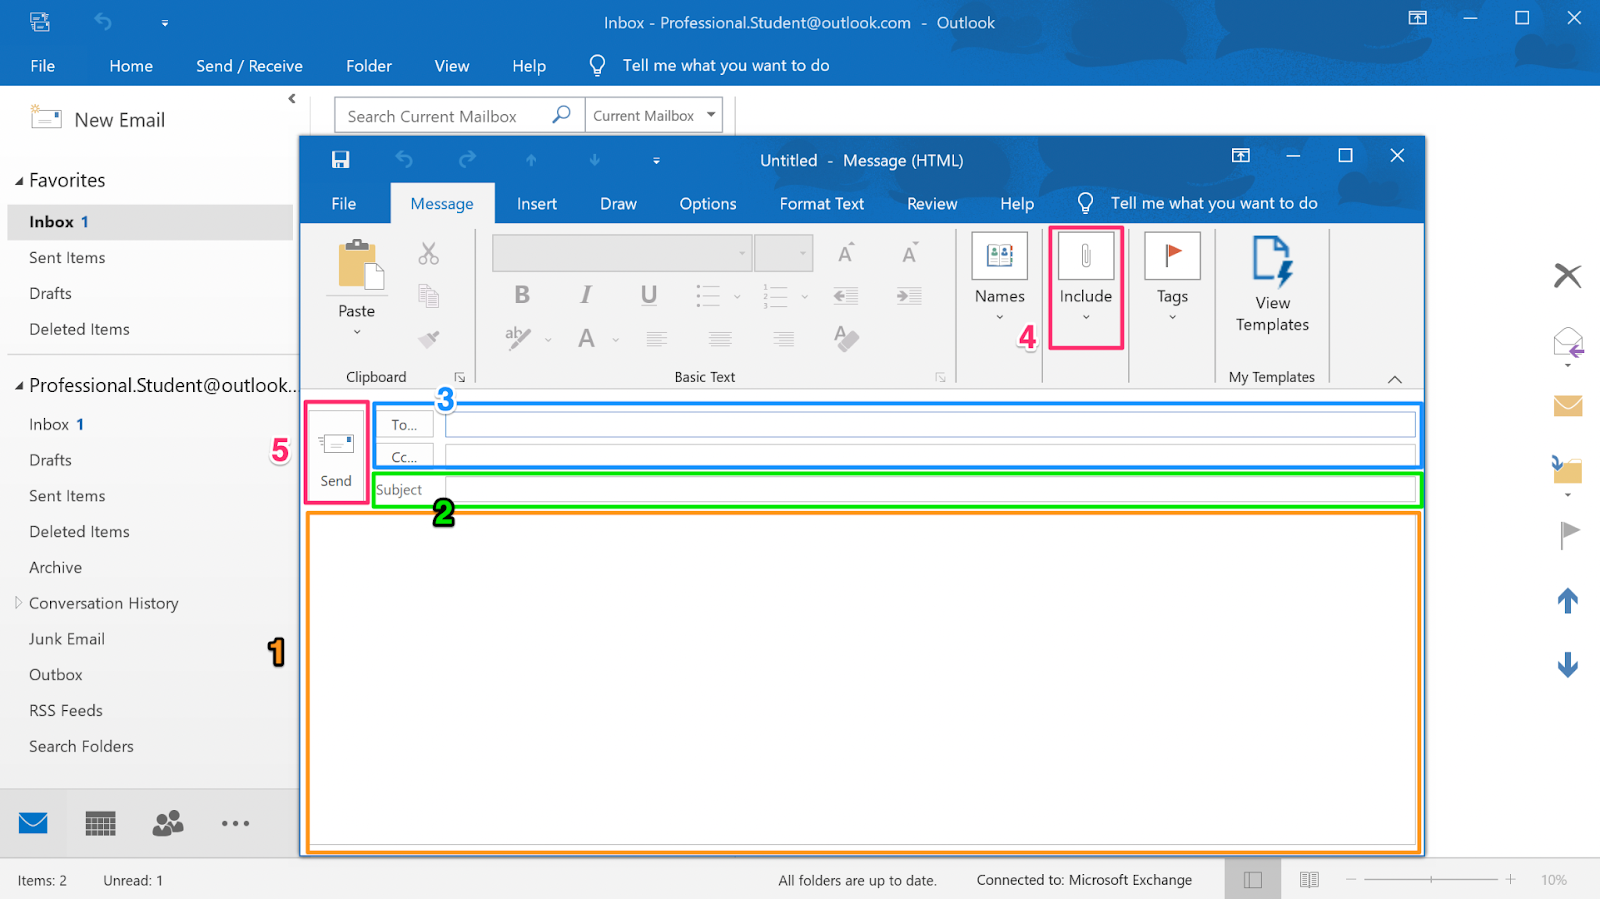
- Email body. Type your message in the email body.
- Subject line. Type the subject line of the message.
- Recipients. Add recipients for the message. Remember, it’s a good idea to add recipients last so you don’t accidentally send a message before it is completed.
- Attachments. Attach any necessary attachments.
- Send. Select Send when you are ready to send your email. Remember to review your email to ensure it is adequate and appropriate before sending.
Attachments
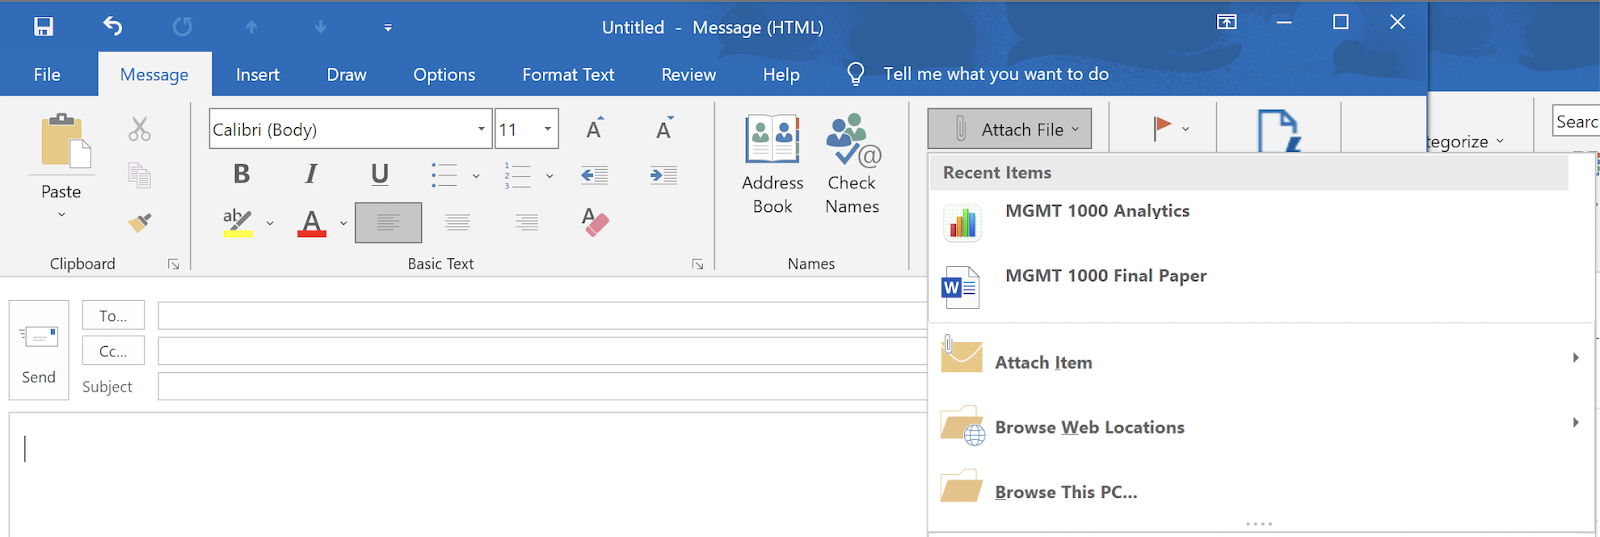
To attach a file, look for the paper clip icon and select either Attach File or Include>Attach File (it may appear differently depending on how large your new message window is). You can select which file to attach from that menu one of the following ways:
- Recent items will appear at the top and you can select one of them.
- Attach Item lets you attach a business card or Outlook Item (e.g. another email).
- Browse Web Locations allows you to search for files on web locations linked to your email account such as OneDrive or SharePoint.
- Browse This PC to search your folders for the file.
You can also drag and drop the file from your desktop or another folder on your computer into the body of the email to attach it.
Email attachments can be almost any common file type, including Word documents, Excel spreadsheets, Powerpoint presentations, PDFs, and images such as JPEG and PNG files. Email attachments generally have a size limit of 10 MB (for business email accounts) or 20 MB (for internet email accounts). If you try to send an email with an attachment that is too large, you will receive a warning message.
If your file is too large to attach, there are a few options to send it:
- Upload your file to a cloud storage site, such as OneDrive, Google Drive, Dropbox, or iCloud, and share the link instead.
- Compress or zip the file. This can be done in the file explorer by right clicking and selecting Send to>Compressed (zipped) folder.
- For images, you can reduce the image file size by attaching the image, then clicking File>Info, and then in the Image Attachments section, selecting “Resize large images when I send this message”.
Recipients
There are three different ways to send a message to a recipient.
- Entering a recipient in the To field is most commonly how you will want to send emails to an individual.
- Entering a recipient in the Cc field allows the recipient to receive and view the email just like any recipients in the To field. “Cc” stands for carbon copy, which was a term used previously when paper copies were created using a typewriter and carbon paper. It is typically used when a recipient should be aware of the information contained in the email but is not the person being directly addressed in the message.
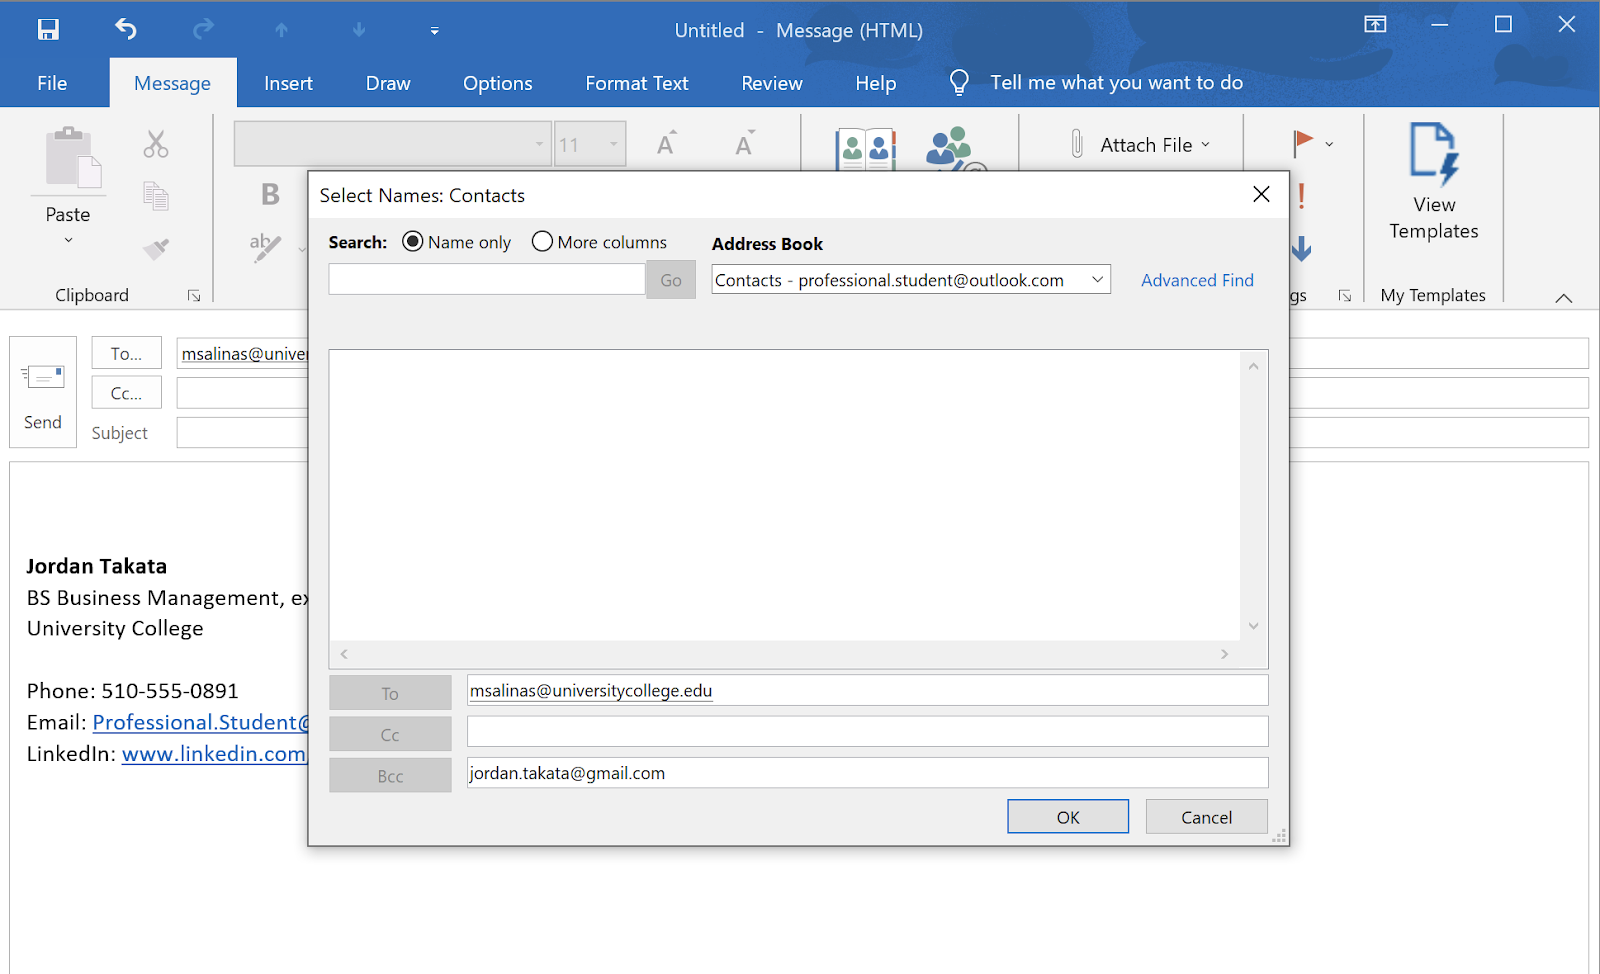
- Entering a recipient in the Bcc field allows the recipient to receive and view the email, but none of the recipients can see the names or email addresses of any recipients who were included in the Bcc field. “Bcc” stands for blind carbon copy. This is a good field to use when you are sending an email to a very large group of people or when you want to keep people’s information private. Keep in mind that if a recipient decides to reply all to an email, their reply will not go to anyone who was Bcc’d on the original email.
To enter recipients in the To and Cc fields, you can type them directly into the correct fields. To enter recipients in the Bcc field, you need to first click Cc, then type them into the Bcc field. Once you have included someone in the Bcc field, you can click OK. When you return to the message draft you will now see the Bcc field appear below the Cc field.
If you have corresponded with someone using email before, most email applications will start to auto-populate the suggested recipient as you start typing their name or email address. If this happens, you can click on the name in the box that appears instead of finishing typing their email address.
Receiving Emails
Your emails are shown chronologically in your inbox, with the most recent emails received at the top. The bolded number next to your inbox shows you the number of unread emails in your inbox.
By default, emails are grouped as Conversations. This means that when you receive or reply to a message, all replies are grouped together. Grouping emails as conversations is typically preferred as you can quickly see all emails related to that conversation. If you’d like each email to appear separately, this setting can be changed by clicking the View tab and then unchecking the Show as Conversations box.
If you are using Microsoft Outlook 2019 or a more recent version, you will see your inbox has two tabs–Focused and Other. Outlook automatically sorts your emails so your most important emails go to your Focused inbox, while others go to the Other inbox. Things like newsletters and machine generated emails will go to the Other inbox. You can easily switch between the two tabs at any time and a banner at the top of the Focused tab will let you know a summary of what has recently arrived in the Other tab.
If an email goes into the Other tab that you’d prefer to go into your Focused tab, you can right click on the email and select Move to Focused. Similarly, if an email goes into the Focused tab, you can right click and select Move to Other.
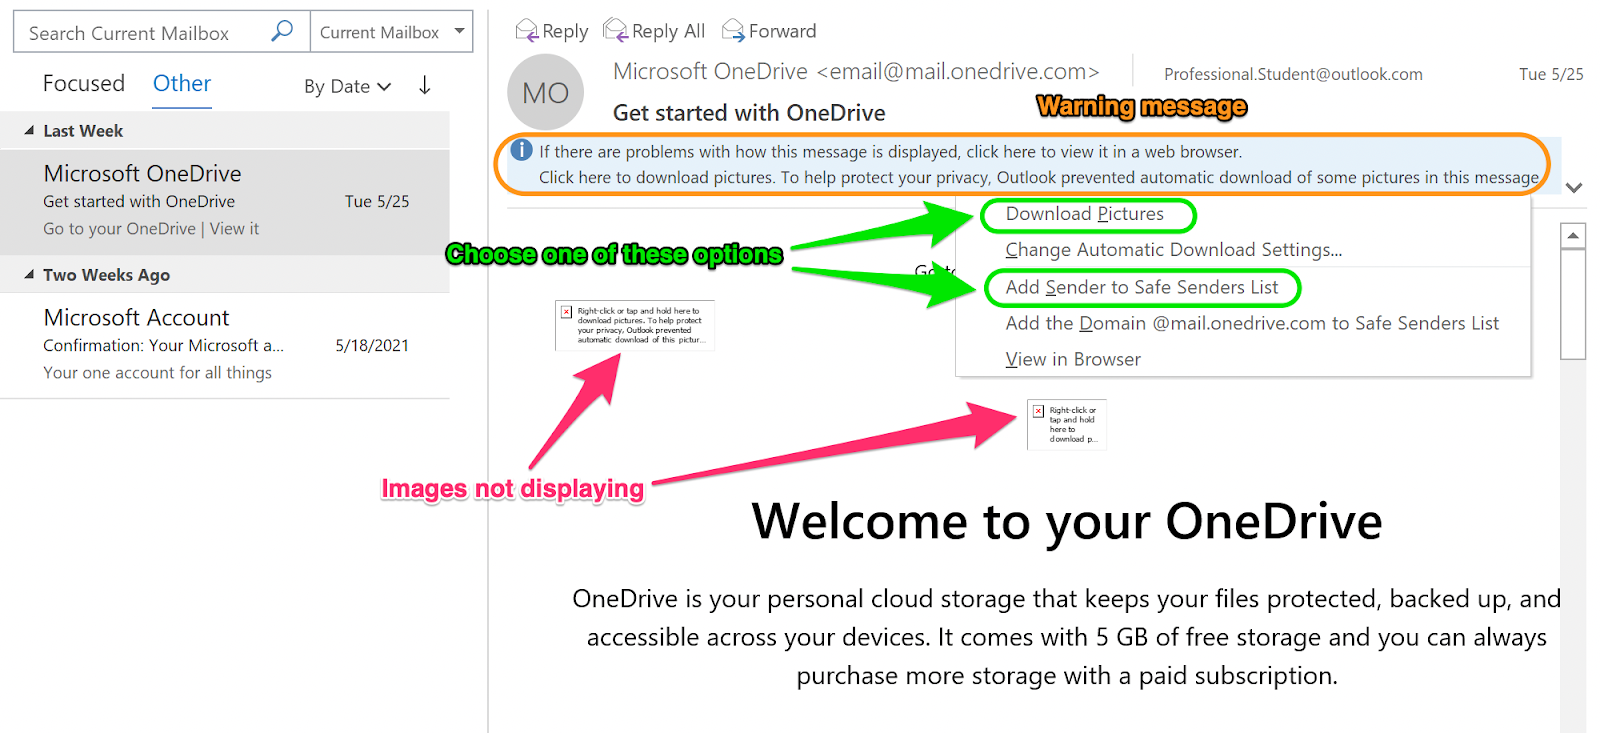
For your protection, many emails will arrive with pictures not displayed. If this happens and you trust the sender, you can click on the warning message at the top of the email and select Download pictures. You can also select Add Sender to Safe Senders List so that emails from that address automatically download pictures in the future.
Replying to or Forwarding an Email
When you receive an email, you have the option to reply, reply all, or forward. Reply sends a response only to the original sender. Reply All sends an email to the original sender as well as everyone who was included on the original message in the “To” or “Cc” fields (but not anyone who was in the “Bcc” field, that’s why it’s called blind carbon copy). When you reply or reply all to an email, it automatically adds an “Re:” to the beginning of the subject line.
Forwarding an email allows you to enter new recipients but copies the original message in a new email. When you forward an email, it automatically adds an “Fw:” to the beginning of the subject line.
PRACTICE QUESTION
Candela Citations
- Sending and Receiving Emails and Attachments. Authored by: Lumen Learning. License: CC BY: Attribution
