Learning Outcomes
- Create a Word document with customized template.
As Rosamine creates the sales report, the first step she takes is to open the Word application and create a new document using company templates—Rowan Retail Sales Report. She searches for the exact template and selects it by clicking on the image in the Word window.
This is what the template for the sales report looks like. It is in newsletter form with two columns because that is the way the GM prefers the report to be formatted.
Rosamine wants to customize this report, so she starts to tweak it before she starts composing.
Customize Template
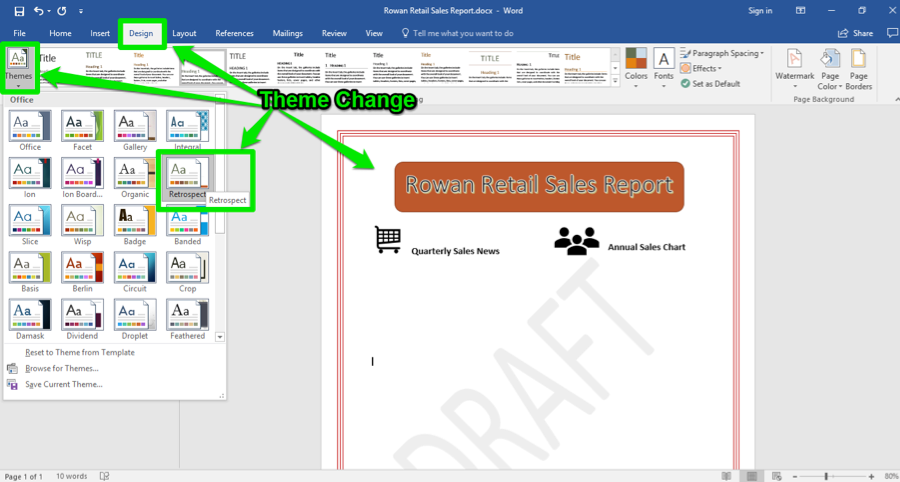
The first thing Rosamine decides is to change the look and feel of the template. She changes the theme by clicking on the Design Tab then the Themes button on the far upper left. Rosamine picked the Retrospect theme, which changes the text and colors from the golden yellow color to a red/orange theme.
Next, Rosamine removes the DRAFT watermark from the report.
Still in the Design tab, she moves to the upper right buttons and selects the Watermark button.
- Design Tab. Variety of possible changes for a document.
- Watermark Button. This button inserts or removes a variety of watermarks.
- Remove Watermark Button. Rosamine selects this and the DRAFT watermark is removed from her report.
Practice Questions
Candela Citations
- Customized Word Templates. Authored by: Sherri Pendleton. Provided by: Lumen Learning. License: CC BY: Attribution


