Geologists use a lot of tools to aid their studies. Some of the most common tools used are compasses, rock hammers, hand lenses, and field books.
Compasses
There are a number of different (specialised) magnetic compasses used by geologists to measure orientation of geological structures, as they map in the field, to analyse (and document) the geometry of bedding planes, joints, and/or metamorphic foliations and lineations.[1] In this aspect the most common device used to date is the analogue compass.
Classic geological compasses
Classic geological compasses that are of practical use combine two functions, direction finding and navigation (especially in remote areas), and the ability to measure strike and dip of bedding surfaces and/or metamorphic foliation planes. Structural geologists (i.e. those concerned with geometry and the pattern of relative movement) also have a need to measure the plunge and plunge direction of lineations.
Compasses in common use include the Brunton compass and the Silva compass.
Modern Geological Compasses
The concept of modern geological compass was developed by Eberhard Clar of the University of Vienna during his work as structural geologist. He published it in 1954.[2] An advantage of his concept is that strike and dip is measured in one step, using the vertical circle for dip angle and the compass for the strike direction. The first implementation was done by the VEB Freiberger Präzisionsmechanik in Freiberg, Germany. The details of the design were made in a close cooperation with the Freiberg University of Mining and Technology.[3]

Setup of a modern geological compass after Prof. Clar (Freiberger), total view |

top view |

bottom side |
Usage
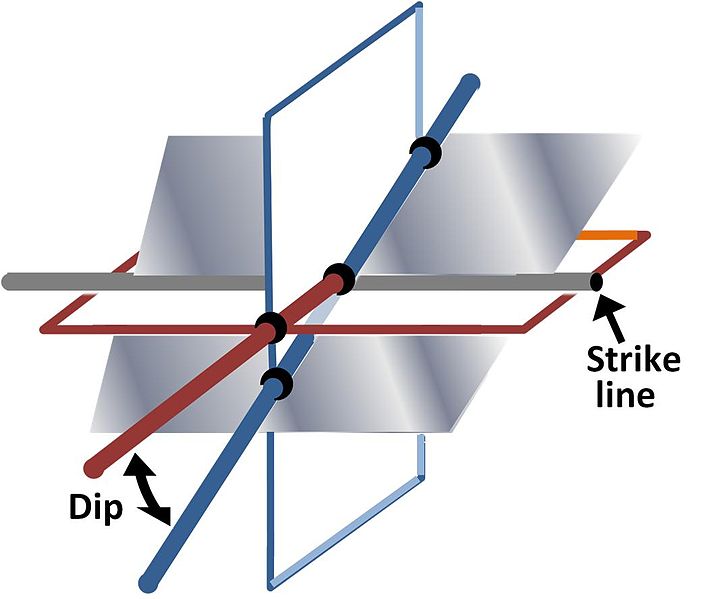
Strike line and dip of a plane describing attitude relative to a horizontal plane and a vertical plane perpendicular to the strike line
At first sight it appears confusing to the novice user, for the numbers on the compass dial ascend in an anticlockwise direction. This is because the compass is used to determine dip and dip-direction of surfaces (foliations), and plunge and plunge-direction of lines (lineations). To use the compass one aligns the lid of the compass with the orientation of the surface to be measured (to obtain dip and dip direction), or the edge of the lid of the compass with the orientation of the line (to obtain plunge and plunge direction). The compass must be twisted so that the base of the compass becomes horizontal, as accomplished using the spirit level incorporated in it. The needle of the compass is then freed by using the side button, and allowed to spin until the damping action slows its movement, and then stabilises. The side button is released and the needle is then firmly held in place, allowing the user thereafter to conveniently read the orientation measured. One first reads the scale that shows the angle subtended by the lid of the compass, and then depending on the colour shown (red or black) the end of the compass needle with the corresponding colour. Data are then recorded as (for example) 25°->333° (dip and dip-direction) or (plunge and plunge-direction).
This compass has the most use by structural geologists, measuring foliation and lineation in metamorphic rocks, or faults and joints in mining areas.
Digital Compasses
With the advent of the smartphone, geological compass programs based on the 3-axis teslameter and the 3-axis accelerometer have also begun to appear. These compass programs use vector algebra to compute plane and lineation orientations from the accelerometer and magnetometer data, and permit rapid collection of many measurements. However, some problems are potentially present. Smartphones produce a strong magnetic field of their own which must be compensated by software; as well, because the Earth’s magnetic field fluctuates rapidly, measurements made by smartphone geological compasses can potentially be susceptible to considerable noise. Users of a smartphone compass should carefully calibrate their devices and run several tests against traditional magnetic compasses in order to understand the limitations of their chosen program.
Rock Hammers
A geologist’s hammer used to break up rocks, as well as a scale in the photograph
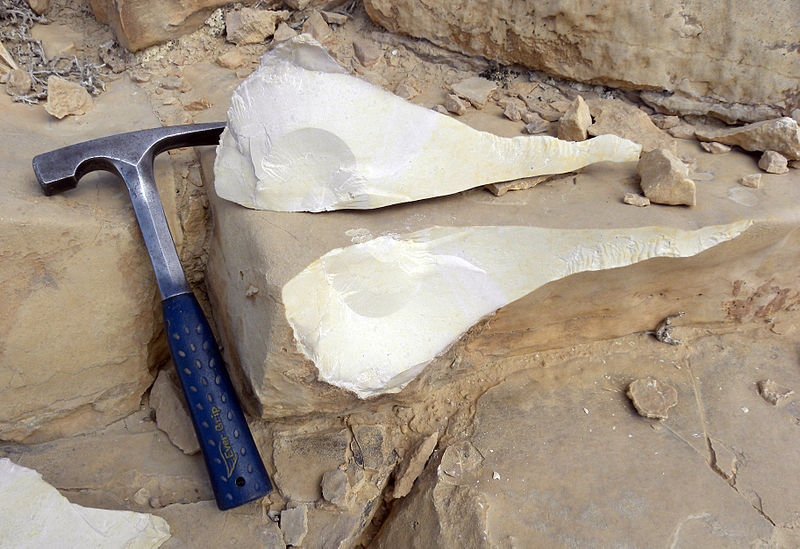
A geologist’s hammer, rock hammer, rock pick, or geological pick is a hammer used for splitting and breaking rocks. In field geology, they are used to obtain a fresh surface of a rock to determine its composition, nature, mineralogy, history, and field estimate of rock strength. In fossil and mineral collecting, they are employed to break rocks with the aim of revealing fossils inside. Geologist’s hammers are also sometimes used for scale in a photograph.
Shape
Geologist’s hammers, as with most hammers, have two heads, one on either side. Most commonly, the tool consists of a flat head on one end, with either a chisel or a pick head at the other end. MartinS (2006).
- A chisel head (pictured), which is shaped like a chisel, is useful for clearing covering vegetation from exposures and is sometimes (though inadvisedly) used to pry open fissures. Some rocks can be easily split, like slate or shale, to reveal any fossils.
- A pick head, which terminates in a sharp point to deliver maximum pressure, is often preferred for harder rocks. A geologist’s hammer bearing a pick end is often referred to as a rock pick or geological pick instead of a geologist’s hammer.
- A flat head is used to deliver a blow to a rock with the intention of splitting it. Specimens or samples can be trimmed to remove sharp corners or reduce them in size.
Construction

A geologist’s hammer with tubular shaft and chisel head
The effective power of a geologist’s hammer is mainly considered to be a reflection of its head weight and handle length. Head weight may range from 8 oz (225 g) or less on a small hammer—such as would generally be used for casual use or by children—to 24 oz (680 g) and greater. A hammer of 16 oz (450 g) is often quoted as sufficient for all rock types, although metamorphic or igneous rocks often require heavier hammers for a more powerful blow.
The best geologist’s hammers are forged from one piece of hardened steel, which renders them sturdy and long-lasting. Alternatives such as tubular- and wooden-shafted hammers are more commonly used, in part due to their lower cost. Such alternative handles sacrifice strength and make the hammer unsuitable for high-strain activities such as prying.
The form and weighting of the shaft defines the balance, which itself defines the ease, efficiency, and comfort of use of the geologist’s hammer.
Hand Lenses
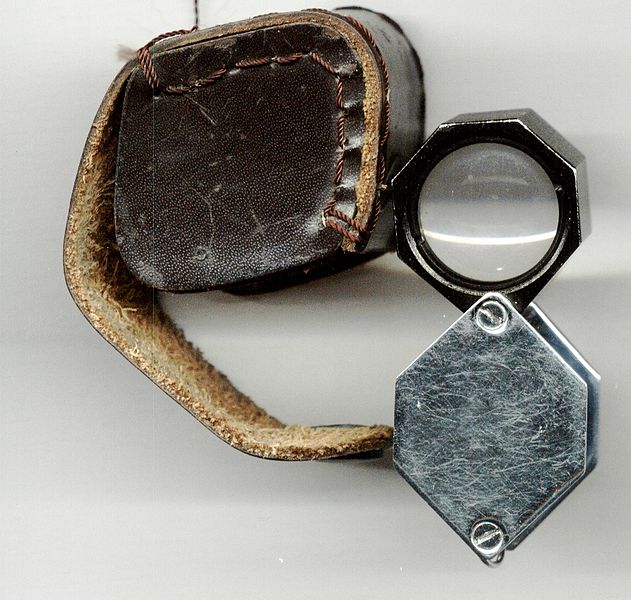
Loupe used by a geologist
The hand lens is a vital geological field tool used to identify small mineral crystals and structures in rocks. It is a simple, small magnification device used to see small details more closely. Unlike a magnifying glass, a loupe does not have an attached handle, and its focusing lens(es) are contained in an opaque cylinder or cone or fold into an enclosing housing that protects the lenses when not in use.
Three basic types of hand lenses exist:
- Simple lenses, which result in the highest degree of optical aberration and are generally lower magnification.
- Multiple lenses, generally higher magnification because of the reduced optical aberration.
- Prismatic, Multiple lenses with prisms used to change the perspective.
Jewelers typically use a monocular, handheld loupe in order to magnify gemstones and other jewelry that they wish to inspect.[4] A 10x magnification is good to use for inspecting jewelry and hallmarks[5] and is the Gemological Institute of America’s standard for grading diamond clarity. Stones will sometimes be inspected at higher magnifications than 10x, although the depth of field, which is the area in focus, becomes too small to be instructive.[6] The accepted standard for grading diamonds is therefore that inclusions and blemishes visible at 10x impact the clarity grade.[7]
Field Books
Field books are used to take fieldnotes; they can be anything from a composition type notebook to a spiral, but most use an actual “field book” like those available for purchase here. Fieldnotes refer to qualitative notes recorded by scientists during or after their observation of a specific phenomenon they are studying. They are intended to be read as evidence that gives meaning and aids in the understanding of the phenomenon. Fieldnotes allow the researcher to access the subject and record what they observe in an unobtrusive manner.
One major disadvantage of taking fieldnotes is that they are recorded by an observer and are thus subject to (a) memory[8] and (b) possibly, the conscious or unconscious bias of the observer. It is best to record fieldnotes immediately after leaving the site to avoid forgetting important details.
Fieldnotes are particularly valued in geology and other descriptive sciences such as ethnography, biology, and archaeology.
Structure
There are two components of fieldnotes: descriptive information and reflective information.[9]
- Descriptive information is factual data that is being recorded. Factual data includes time and date, the state of the physical setting, social environment, descriptions of the subjects being studied and their roles in the setting, and the impact that the observer may have had on the environment.[10]
- Reflective information is the observer’s reflections about the observation being conducted. These reflections are ideas, questions, concerns, and other related thoughts.[11]
Fieldnotes can also include sketches, diagrams, and other drawings. Visually capturing a phenomenon requires the observer to pay more attention to every detail as to not overlook anything.[12]
Candela Citations
- Revision, Adaptation, and Original Content. Authored by: Kimberly Schulte and Lumen Learning. Provided by: Lumen Learning. License: CC BY-SA: Attribution-ShareAlike
- Geological compass. Provided by: Wikipedia. Located at: https://en.wikipedia.org/wiki/Geological_compass. License: CC BY-SA: Attribution-ShareAlike
- Geologist's hammer. Provided by: Wikipedia. Located at: https://en.wikipedia.org/wiki/Geologist%27s_hammer. License: CC BY-SA: Attribution-ShareAlike
- Loupe. Provided by: Wikipedia. Located at: https://en.wikipedia.org/wiki/Loupe. License: CC BY-SA: Attribution-ShareAlike
- Fieldnotes. Provided by: Wikipedia. Located at: https://en.wikipedia.org/wiki/Fieldnotes. License: CC BY-SA: Attribution-ShareAlike
- The Mapping of Geological Structures (Geological Society of London Handbook Series) [Paperback] K. R. McClay; Statistics of Earth Science Data: Their Distribution in Time, Space and Orientation [Paperback] Graham J. Borradaile (Author) ↵
- Clar, E.: A dual-circle geologist’s and miner’s compass for the measurement of areal and linear geological elements. Separate print from the negotiations of the Federal Institute of Geology Vienna, 1954, vol. 4 ↵
- "Geologist's Compass: Operating Manual," Freiberger Präzisionsmechanik. http://www.fpm.de/downloads/GeologistCompass_eng.pdf. ↵
- "Jewelry - How to Use a Loupe - Using Jewelry Magnifiers". Jewelry.About.com ↵
- Ibid. ↵
- http://www.gemsociety.org/article/10x-loupe-the-gemologists-best-friend/ ↵
- "The 4C's Of Diamonds: Diamond Clarity". Leibish & Co. ↵
- Canfield, Michael (2011). Field Notes on Science & Nature. Harvard University Pres. p. 21. ↵
- Labaree, Robert V. "Research Guides: Organizing Your Social Sciences Research Paper: Writing Field Notes". libguides.usc.edu. Retrieved 2016-04-12. ↵
- Ibid. ↵
- Ibid. ↵
- Canfield,Michael (2011). Field Notes on Science & Nature. p. 162. ↵