Learning Objectives
- Analyze Civil War photographs as primary sources
Making Observations
The previous page gave you the opportunity to engage with a few Civil War images and make an initial study of them. Now we will continue to practice analyzing photographs as primary sources by doing a more thorough investigation of a photo. Take your time to examine the image so you can provide complete, informed responses to the questions. This process typically consists of (1) making observations, (2) reflecting, (3) doing further research, and (4) drawing conclusions from the photograph.
Let’s begin by making observations.
Observe the Photo
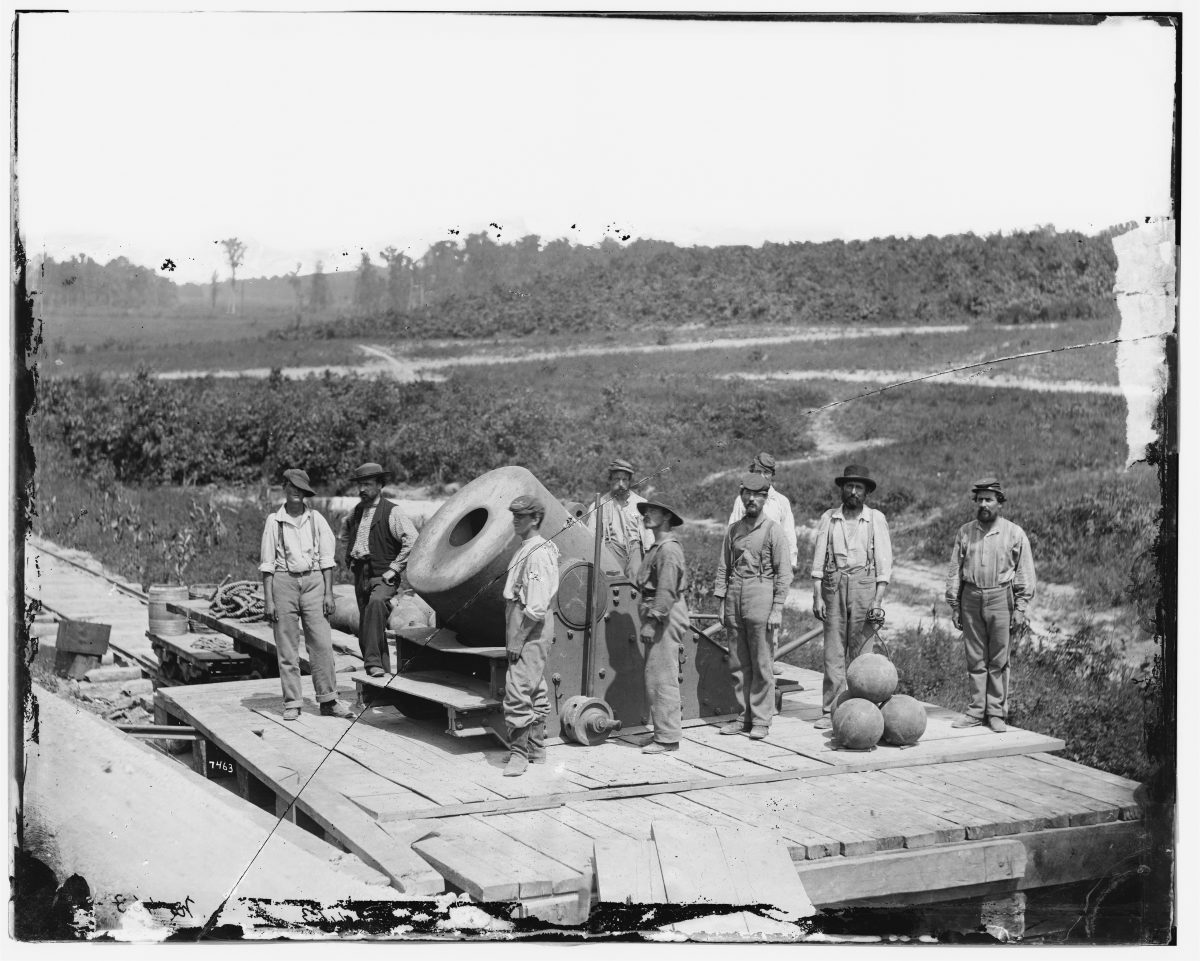
Figure 1. A Civil War photograph by David Knox in Petersburg, Va. Knox was trained by Alexander Gardner, who worked for Mathew Brady until opening his own studio in 1863.
First, let us OBSERVE the picture, meaning to examine the photograph and the details placed before you.
Consider the photograph above (Figure 1), and answer the following questions.
Activity
Now you can try it on your own. Select one photo from this Civil War Photographs Document. Then OBSERVE the picture, meaning to examine the details placed before you. This is an open-ended exercise, but you can use the space below to jot down your ideas.
- What do you notice first?
- What people and objects are shown?
- How are they arranged?
- What is the physical setting?
- What other details can you see?
Reflection
Next, we will take time to REFLECT – to think deeper about the image before you.
Reflect on the photo
Figure 2. A Civil War photograph by David Knox in Petersburg, Va. Knox was trained by Alexander Gardner, who worked for Mathew Brady until opening his own studio in 1863.
Consider the photograph above (Figure 1), and answer the following questions.
Activity
Now, take time to REFLECT – to think deeper about the image before you. Examine the photograph you chose from this Civil War Photographs Document again. This is an open-ended exercise, but you can use the space below to jot down your ideas.
- Why do you think this image was made?
- What’s happening in the image?
- When do you think it was made?
- Who do you think was the audience for this image?
- What can you learn from examining this image?
Further Research
We learned earlier about a helpful mnemonic that reminds us to pause and gather a little more information about sources before we do anything with them. This is called the SIFT method, which stands for stop, investigate, find better coverage, and trace claims. Just as you might do this with a quote or article you find online, you should also do this with images. Fortunately, you can do this relatively simply by using the image search feature in your web browser. When in Google Chrome, just right-click the image and choose “Search Image with Google Lens.”

Figure 3. Right click on an image inside of Google Chrome to “Search Image with Google Lens” (Note that this was previously labeled “Search Google for Image.”)
That will take you to your search results and to Google’s best visual matches. Note that this tool even lets you search within an image, so you can zoom in on specific aspects of the photograph to learn more.

Figure 4. This shows the search results after using Google lens, which can reveal more insights into your image. Sometimes this will give you the information you need from the “visual matches” section, or you may need to do a reverse-image search, which you can do by choosing the option to “Retry with Google Images” in the lower-right corner.
If Google Lens does not provide the search results you need, another way to access the reserve image search tool is by using the Google Images search feature. To do this, right-click on an image you are curious about, and click “Copy image address.” Click the “Click Search by image icon () in Google Images and paste your image URL into the textbox.
You can also modify the words in the image search text to look for different results. Google automatically searched for “Civil War Photo” in this example, and when we click on the first image, it takes us to a Library of Congress page about “The Dictator” mortar.

Figure 5. Because Google search automatically guesses search terms and sometimes those searches are incorrect, you can change the search terminology to something more broad to get even more results.
The results verify that the gun was called the “Dictator” and was used during the siege of Petersburg.

Figure 6. Google image search results reveal that the Civil War Image with the large cannon was, in fact, used at the siege of Petersburg, and it was also called the “Dictator.”
Now that we’ve found the key information, we can use the regular Google Search tool to find even more information about it. For example, this Civil War website has a short article about “The Dictator,” where we learn that the mortar weighed 17,120 pounds, was moved by railroad, and fired from a flatcar, where it recoiled 10 to 12 feet when fired. It was used by the Union Army, aimed at Confederate artillery, firing 218 rounds during the siege at Petersburg.
Try It
It is your turn to conduct further research on a photograph.
- Following the steps explained above, perform a Google Search on the image below.
- Then explore a few of the websites from the search results.
- Answer the question below.

Figure 7. What is shown in this image? Use Google image search to find out!
Activity
Return to the photo you used from the Civil War Photographs Document.
- Follow the Google Image search process outlined above to do further research on your chosen photograph.
- Compose a paragraph teaching us about your photograph. Try to include location, name of subjects in the image, date (at least the year), and whether it portrays a Union or Confederate scene.
- Lastly, explain why this photograph is significant—how does it enhance our understanding of the Civil War?
This is an open-ended exercise, but you can use the space below to jot down your ideas.
Conclusion
The photographs taken by Mathew Brady and his team are an important collection of primary sources from the Civil War. While to modern viewers perhaps these images of wounded and deceased bodies are not graphic, to Americans at the time – unexposed to scenes like this – these were shocking. As historian Drew Faust writes, “For the first time civilians directly confronted the reality of battlefield death, rendered by the new art of photography. They found themselves transfixed by the paradoxically lifelike renderings of the slain . . . . If Brady ‘has not brought bodies and laid them in our doorways and along the streets, he has done something very like it,’ wrote the New York Times.'” [from This Republic of Suffering: Death and the American Civil War, by Drew Gilpin Faust, New York: Vintage Books, 2008, pages xvi-xvii]
Historians can also be transfixed by these invaluable primary sources that captured a tragic and crucial time in the history of the United States. With critical analysis and careful consideration of these photographs, we can learn a great deal about the time when America went to war with itself. That is the power of primary source photographs from any time period – they offer us a unique lens into our history, bringing to life people and places from the past.
Candela Citations
- Analyzing Photographs. Authored by: Megan Coplen for Lumen Learning. Provided by: Lumen Learning. License: CC BY: Attribution
- Dictactor Mortar. Provided by: Library of Congress. Located at: https://www.loc.gov/resource/ppmsca.32420/. License: Public Domain: No Known Copyright
- Analyzing Photographs and Prints. Provided by: Library of Congress. Located at: https://www.loc.gov/static/programs/teachers/getting-started-with-primary-sources/documents/Analyzing_Photographs_and_Prints.pdf. License: Public Domain: No Known Copyright
- Civil War Photograph. Provided by: Getty. Located at: https://www.getty.edu/art/collection/objects/40196/henry-p-moore-slaves-of-general-thomas-f-drayton-american-about-1862-1863/. License: Public Domain: No Known Copyright