Instructions—those step-by-step explanations of how to build, operate, repair, or maintain things—are one of the most common and important types of technical writing. However, for something seemingly so easy and intuitive, instructions are some of the worst-written documents you can find. You’ve probably had many infuriating experiences with badly written instructions. Hopefully, the information on this page will help you write good ones.

Good instructions require:
- Clear, concise writing
- A thorough understanding of the procedure in all its technical detail
- Ability to put yourself in the place of the reader, the person trying to use your instructions
- Ability to visualize the procedure in great detail and to capture that awareness on paper
- Willingness to test your instructions on the kind of person you wrote them for
Instructions incorporate items such as chronological organization, headings, lists, and special notices. However, you need to plan carefully before you apply these format items, in order to write effective, usable instructions.
Preparing to Write Instructions
Good instructions begin with good preparation, which involves audience, type, organizational approach, and task analysis.
Analyze your Audience
Early in the process, define the audience and situation of your instructions. Remember that defining an audience means defining its level of familiarity with the topic as well as other details, including age and ability level.
Analyze your Organizational Approach – Tasks or Tools
Instructions can be organized by tasks or tools.
A task approach deals with the things the user needs to do. For example, the process of finding free images for a technical document might involve the following tasks: research sites with creative commons licenses, review the sites and prioritize them according to size of database and ease of use, choose one site, identify key words that explain the concept you want to illustrate, etc.
A tools approach focuses on the things with which a user needs to interact. For example, the process of using a photocopy machine would involve writing steps for using each of its tools: cancel button, enlarge/reduce button, collate/staple button, etc. Instructions using this approach are hard to make work. Sometimes, the name of the button doesn’t quite match the task it is associated with; sometimes you have to use more than just the one button to accomplish the task. Still, there can be times when the tools/feature approach may be useful, depending on your audience analysis and your objective in writing the instructions.
Analyze the Procedure’s Tasks
Since most instructions are task-based, doing a task analysis is a key preliminary step in writing instructions. It’s important to determine the steps in the process or procedure you’re going to write about. Particularly in technical instructions, your understanding of the procedure could make the difference between success and failure, or at more complex levels, life and death.

A thorough task analysis involves studying how users use the product or do the task, interviewing them, and watching them. It can also mean interviewing marketing, product development, and help desk professionals. However, sometimes you may not be able to do a thorough task analysis. Typically, product developers don’t think about documentation until rather late, and it may be difficult to get marketing, development, engineering, and programming professionals to spend enough time with you to explain the product thoroughly. So you need to try the procedure yourself, if possible, and understand that you may end up doing a certain amount of educated guesswork. The developer is more likely to review your draft and let you know if your guesswork is right.
1. Identify one or many tasks
Examine the overall procedure you are describing to determine the number of instructional tasks. A task is an independent group of actions within the procedure. For example, setting the clock on a microwave oven is one task in the overall procedure of operating a microwave oven (which would include other tasks such as setting the clock, setting the power level, using the timer, cleaning and maintaining the microwave).
A simple procedure such as changing the oil in a car contains only one task; there are no independent groupings of activities. Within that task are a number of steps, such as removing the plug, draining the old oil, replacing the filter, and adding the new oil, which all contribute to the one task of changing the oil. However, you may be writing instructions for a complex procedure, which involves several independent tasks within the overall procedure. For example, if you were writing instructions for maintaining a car on your own, you’d have the following independent tasks in your instruction booklet: changing the oil, rotating the tires, checking the fluids, replacing the windshield wiper blades, and so on.
Task analysis can be complex; see a Sample Task Analysis to understand the precision and detail involved.
2. Identify the steps within each task
Once you have identified tasks, identify the steps within each task. As you can see, you “drill down” during the task analysis preliminary phase, to examine all aspects of the procedure in depth, so as not to miss anything critical to a user who actually needs to follow the instructions.
3. Group tasks logically
Finally, decide how to group tasks within a complex procedure. For example, the following are common task groupings in instructions:
- unpacking and setup tasks
- installing and customizing tasks
- basic operating tasks
- routine maintenance tasks
- troubleshooting tasks
Writing Instructions
Although explaining the tasks that you identify in a task analysis provides the bulk of the content for instructions, there are more pieces to formal instructions and more considerations, such as visuals, that you need to deal with when you write. Instructions contain the following parts, often in the following order. Note that inclusion of these items, as well as their order, may vary, depending on the instructions’ content, purpose, and audience.

Title
The title for instructions should be precise and concise. Opt for “how to” or an “-ing” phrase, such as “How to Clean your Microwave” or “Maintaining Your Apple iPhone.”
Date
With technical instructions, the date is crucial. The date enables the reader to be certain that these instructions are the most current, and if they are not, where the instructions belong in the line of documents related to this product or procedure.
Table of Contents
A table of contents is optional. Use one if your instructions consist of multiple tasks or have multiple sections, or if they are being presented in the form of a manual.
Introduction
Plan the introduction to your instructions carefully. Make sure it does any of the following things as appropriate, in whatever order is appropriate for your purpose and audience:
- Provide a general idea of the procedure and what it accomplishes.
- Indicate the scope of coverage—what the instructions will and will not cover.
- Indicate what the audience needs in terms of knowledge and background to understand the instructions.
- If this is a lengthy set of instructions, indicate how much time a user may need to complete the task or procedure.
- Indicate the conditions when these instructions should (or should not) be used.
Preliminary Notes & Warning Notices
Although notes and warning notices should occur in the specific steps themselves, you may need to emphasize notes and warnings earlier in the instructions, especially if there is a possibility of readers ruining their equipment, wasting supplies, causing the entire procedure to fail, and/or hurting themselves. It’s fine to put important notes and warnings in two places within the instructions. Companies have been sued for lack of these special notices, for poorly written special notices, or for special notices that were out of place.
Technical Background or Theory
You may need to discuss background and/or theory in the preliminary material for certain kinds of instructions, so that the steps in the procedure make sense to your reader. This is a place to include technical definitions or descriptions if needed.
Equipment and Supplies
Notice that most instructions include a list of the things you need to gather before you start the procedure. This includes equipment, the tools you use in the procedure, and supplies (things that are consumed in the procedure such as wood, paint, or nails). Note that you may need to specify some or all of the items, with brand names, sizes, amounts, types, model numbers, and so on.
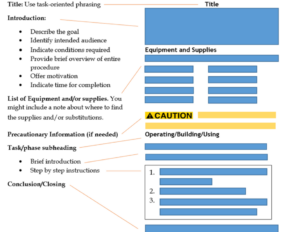
Discussion of the Steps
The following schematic shows some of the initial sections and the discussion of the steps in instructions.
When you get to the actual writing of the steps, there are several things to keep in mind:
- structure and format of the steps
- supplemental information that might be needed
- visuals
- point of view and general writing style
1. Structure and Format of the Steps
Most instructions number the tasks and steps chronologically. But there are many methods of structuring and formatting instructions, depending on your content and purpose.
- Fixed-order steps must be performed in the order presented. For example, if you are changing the oil in a car, draining the oil is a step that must come before putting in the new oil. Use numbered lists for fixed-order steps. When in doubt, structure your instructions in this format. You may then use notes to indicate if there is any leeway to perform the steps in another sequence.
- Variable-order steps can be performed in practically any order. Good examples are those troubleshooting guides that tell you to “check this, check that” when you are trying to fix something. Since a particular sequence is not relevant, use a bulleted list for variable-order steps.
- Alternate steps offer two or more ways to accomplish the same thing, or different ways to proceed when different conditions exist. Use bulleted lists with alternate steps, with “OR” inserted between the alternatives. Or you can use a lead-in sentence that indicates that alternatives are about to be presented.
- Nested steps are those in which individual steps within a procedure need to be broken down into sub-steps. In this case, number the main steps and then indent further and sequence the sub-steps as a, b, c, and so on.
2. Supplemental Information/Glosses
Often, it is not enough simply to tell readers what to do. They need additional explanatory information such as how the thing should look before and after the step, why they should care about doing this step, what mechanical principle is behind what they are doing, or even more micro-level explanation of the step. This is where supplemental information, often called a gloss, becomes important. (You know the word “glossary,” which is a set of explanations of various terms. A “gloss” is a single, brief explanation.)
The problem with supplemental information, though, is that it can hide the actual step. You want the actual step—the specific actions the reader is to take—to stand out. There are at least two techniques to avoid this problem: you can split the supplement into a separate paragraph nested under the instruction, or you can bold the instruction.
sample supplemental information/glosses in instructions
When changing engine oil, always check the owner’s manual to find the correct amount and type of oil and filter needed.
- Start the vehicle and allow the engine to warm up for a minute.
This allows the existing oil in the engine to warm up so that it drains out very smoothly. - Locate the oil pan drain plug and remove the plug for draining.
Removing the fill cap and pulling the oil dipstick will allow good flow for the oil while draining. If there is more than one plug, drain the oil from both plugs into a container.
3. Visuals

Illustrations are often critical to readers’ ability to visualize what they are supposed to do. Consider the example of car repair manuals which actually use photographs to illustrate procedures, or screen shots that demonstrate the process of using software. Most instructions rely on visuals. Generally, it is good to have both text and visuals in your instructions since your audience is likely comprised of people with different learning styles.
Visuals help clarify a concept that’s difficult to explain using only words. They may be used to show how something looks unassembled, how something is constructed, and how something should look once the steps have been completed. Graphics are useful since almost everyone can understand visual instructions and see exactly what they need to complete. Just be sure that the graphics you choose are appropriate and placed in close proximity to the steps they illustrate. Don’t make your audience flip pages to see the accompanying graphic.
See a sample of screen shot visuals incorporated into a simple set of instructions on How to Make a Checklist in D2L. (Desire to Learn, D2L, is a learning management system. The checklist function helps students know what tasks need to be completed within a course module.)
4. Point of View and General Writing Style
Instructions use commands, action verbs, and “you” orientation. For example, “Advance the Timer button to 4.” This approach immediately clarifies the action that the user should perform. Do not use passive voice in instructions, e.g., “The Timer button is then set to 4.” With the passive voice example, a reader may misunderstand and think that the Timer button will automatically go to 4, as opposed to understanding that they have to advance the Timer themselves.
Another of the typical problems with writing style in instructions is that writers often leave out articles (a, an, the). For example, “Press Pause button on front panel to stop display of information temporarily.” Write as you would normally write a sentence, including articles.
Conclusion
Don’t end the instructions with the last step. A conclusion can offer a general insight, trouble shooting information (i.e. what to do if something went wrong), and/or contact information. Include whatever is appropriate to the instructions.
Other Back Matter
You may include, as appropriate, a list of references, glossary, appendix, index, or technical specifications. Back matter items provide additional information that non-technical audiences, or audiences without specific background, may need to understand how to complete the procedure.
Final Thoughts about Instructions
As a technical or workplace writer, your ability to write good instructions carries a number of ethical implications. Keep in mind that poorly or carelessly designed instructions leave you or your company liable for damages. They also destroy your credibility and authority. Before you submit any instructions for final review, be sure you get feedback from others. For small or routine procedures, it may be enough to have a coworker review them, but more complex instructions should always be tested for usability
Candela Citations
- Instructions, adapted from Online Technical Communication, Technical Writing Essentials, and Technical Writing for Technicians; attributions below. Authored by: Susan Oaks. Provided by: Empire State College, SUNY. Project: Technical Writing. License: CC BY-NC: Attribution-NonCommercial
- Instructions (pages 1-4 of 5). Authored by: David McMurrey & Cassandra Race. Provided by: Kennesaw State University. Located at: https://softchalkcloud.com/lesson/serve/Ds4qR8ZHANKM7E/html. Project: Open Technical Communication. License: CC BY: Attribution
- Task Analysis. Authored by: David McMurrey & Tamara Powell. Provided by: Kennesaw State University. Located at: https://softchalkcloud.com/lesson/serve/OueEigLfnGbo8l/html. Project: Open Technical Communication. License: CC BY: Attribution
- 7.7 Writing Instructions. Authored by: Suzan Last. Provided by: University of Victoria. Located at: https://pressbooks.bccampus.ca/technicalwriting/chapter/writinginstructions/. Project: Technical Writing Essentials. License: CC BY: Attribution
- Writing Instructions. Authored by: Will Fleming. Provided by: LBCC. Located at: https://openoregon.pressbooks.pub/ctetechwriting/chapter/chapter-5-writing-instructions/. Project: Technical Writing for Technicians. License: CC BY: Attribution
- image of wordle with the word Instructions. Authored by: Wokandapix. Provided by: Pixabay. Located at: https://pixabay.com/photos/education-instruction-school-learn-614155/. License: CC0: No Rights Reserved
- image of person doing a task analysis. Authored by: RAEng_Publications. Provided by: Pixabay. Located at: https://pixabay.com/photos/engineer-engineering-4922775/. License: CC0: No Rights Reserved
- image of person writing at a white board. Authored by: RAEng_Publications. Provided by: Pixabay. Located at: https://pixabay.com/photos/engineer-engineering-software-4904883/. License: CC0: No Rights Reserved
- image of person with an illustration on a computer screen. Authored by: RAEng_Publications. Provided by: Pixabay. Located at: https://pixabay.com/photos/engineer-engineering-mechanical-4915799/. License: CC0: No Rights Reserved